A glute kickback is an exercise that strengthens your gluteus minimus. That is one of the secondary muscles that helps with hip extension, and it’s very hard to target.
Strong glutes help with hip extension, which makes everyday tasks, like bending over and picking up an object from the floor, easier to perform.
Kickbacks target where your glutes and hamstrings meet, so think of the backward movement of your thigh. They are extremely effective to help give your glutes (buns if you will) a fullness in appearance. The song “Baby Got Back” comes to mind.
Glutes Are Your Powerhouse

Your glutes power movements like hip extension. They move your legs in three different ways; they extend, abduct, and externally rotate your leg.
So, why are strong glutes important? Strong glutes stabilize your pelvis, and keep your hip joints mobile. When your buns are strong your lower back doesn’t have to work so hard to move. You should know that stronger glutes increase your speed, and make you more agile, therefore maximizing your athletic performances.
And let’s face it, fuller glutes fill out a pair of jeans real nice! A glute kickback is an exercise done with your leg behind you, or in extension. They can be done kneeling, standing, on a cable machine, and with resistance bands or weights to add intensity. They are one of the very best exercises to properly train the muscles of your booty.
How to Perform a Kneeling Glute Kickback
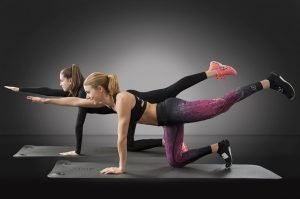
The best way to try out a glute kickback, if you are a beginner, is to perform the exercise in a kneeling position. Think of this way as your entry level into the world of kickbacks. The focus here is to try and get the glute muscles to fire properly. Follow the directions below for a basic kneeling kickback.
- Start in a kneeling hands and knees position. To protect any tenderness in your knee joints, an exercise mat is highly recommended. You want to perform the exercise with a flat back or neutral spine. Start by taking one of your hands to your low back to see if your spine is level. If you are unsure of how to get a neutral spine, stack your shoulders over your wrists and your hips over your knees. It is important to approach this exercise with proper form!
- Press your hands down firmly into the floor. Extend your right leg behind you. Lift your extended right leg off the floor. Your right thigh should be parallel to the floor. There should be a straight line from your shoulder, to your booty, to your right foot.
- When you first try the basic kneeling glute kickback, your focus is to fire the glute muscles. So firm your right buttocks as you extend your right leg behind you. Hold 10 seconds. Switch sides (left leg extends behind you). Hold 10 seconds. Do a few reps to get the hang of it, all with the proper form mentioned above.
To ramp up the intensity, you can add resistance bands or weights. You can also do these on a cable machine if you are at the gym. Below are some alternatives to the basic kneeling kickbacks.
Kneeling Kickbacks with a Resistance Band
- Start on your hands and knees. Place the resistance band around your shoes and then bring the handles of the band underneath your hands.
- Reach right leg behind you, and lift your leg up off the floor. Remember to keep your thigh parallel to the floor. Hold ten seconds and firm your right glute muscle.
- Return to starting position and repeat. Don’t forget to switch sides!
Kneeling Kickbacks with Weights
- Start in a kneeling position on the floor. Place a hand weight behind your right knee. Keep your right knee in a bent position so you don’t lose your hand weight. Remember to fire your right glute muscle, and to pull in your lower belly so your abdominals stabilize you. Yours shoulders stack over your wrists to keep your spine neutral.
- Lift up your weighted right leg and remember to keep your thigh parallel to the floor. Hold 10 seconds.
- Return to your starting position but this time do not allow your bent, weighted knee to touch the floor. Repeat as many times as you can with good, proper alignment. Don’t forget to switch sides.
Kneeling Kickbacks on a Cable Machine
- Move a bench to a low pulley cable station, you want to position the bench just in front of the cable machine. Take the cuff of the machine and attach it to your right ankle.
- Kneel your left leg across the middle of the bench. Make sure to place your hands underneath your shoulders. Kick your right leg behind you and hold 10 seconds. Contract your glute muscles here! Slowly return to starting position.
- Repeat for as many reps as you can perform with proper form. Don’t forget to switch sides!
How to Perform a Basic Standing Glute Kickback
A standing glute kickback is another excellent way to train the muscles of your backside. The standing kickback is the cousin to the kneeling kickback, and it also has many different variations to try. Of course, I recommend trying the basic standing variation first, if you are new to glute kickbacks. After you get used to doing this movement with good form, you can graduate to adding resistance bands, hand weights, or using a cable machine at the gym.
A basic standing glute kickback is an exercise with one leg forward and one leg extended behind you, therefore, it mimics real life movements such as walking and running. To get the full benefit of this exercise pay special attention to engaging your glute muscles, and firing your abdominal muscles so they support your spine. Follow the directions below to do a basic standing glute kickback…
- Start in a standing position and bring your feet together. Maintain a nice, tall, straight spine. Bring your hands to your hips and pull your low belly in to engage your core.
- Lift up your right leg and bring it directly behind you, lifting your right heel high, but without leaning forward. Both legs stay straight here. Hold ten seconds. Don’t forget to squeeze your right glute.
- Lower your right leg and bring it forward to meet the left leg, but don’t let the right leg touch the floor. Do as many reps as you can while keeping good alignment. In other words, you want a nice, controlled pace.
- Switch sides and repeat!
Once you have the hang of the basic, standing glute kickback you can always try to add resistance bands or weights to add to the intensity.
Standing Glute Kickback with a Resistance Band
- Take your resistance band and secure it around your ankles. The band should be taut, but not so tight that you cannot stand comfortably with your feet hip width apart. Let your hands rest on your hips.
- Move your right leg back behind your left leg, and at first place your toes down as you test the tension in your band. Then, fire your core muscles.
- Kick your right leg back about 6 to 8 inches behind you, and lift your toes off the floor. Keep your knees straight, and squeeze your right glute tightly. Hold 10 seconds.
- Return your right leg back to the original position and repeat as many times as you can with good form. Don’t forget to switch sides and repeat.
Standing Glute Kickback with Weights
- You can use a hand weight or dumbbell here, any weight that is right for you will do. Find a wall for support and face towards the wall. Place feet to hip width apart and bend your right knee. Reach around and put the weight behind your knee and keep your knee bent to keep the weight in place. Rest your hands on the wall.
- Now, move your knee behind you and lift the knee up while you squeeze the right glute. Your left knee will also have a soft bend to it, but the left leg stays on the ground. Hold ten seconds. Add as many reps as you can perform with good alignment.
- Switch sides and repeat!
Standing Glute Kickback a Cable Machine
Performing a standing glute kickback on a cable machine is arguably the best way to do this exercise. Most of us don’t have a cable machine at home, but please enjoy these at the gym! In a cable kickback, your glutes end up spending a long time under tension during each rep, which will lead to muscle growth. Follow the instructions below to do a standing glute kickback with a cable machine.
- Secure the ankle strap around your ankle and set the pulley to the bottom of the cable machine. Step back so the weight will lift up slightly and test the tension.
- Hold the machine for support and brace your core muscles, which will keep you spine in neutral alignment.
- Start to reach the leg that has the attached ankle directly behind you. This will extend the front of your hip. Push your extended leg away from you until you feel the muscles of your glute engage and fire up. Hold ten seconds.
- Return your extended leg to the starting position with a slow, controlled movement. Repeat as many times as you can while still keeping good form. Don’t forget to switch sides and repeat.
Why Train Your Glutes
As a yoga teacher, I firmly believe in the “mind/body connection”, a theory that you need to bridge the mind and the body together when exercising. I mention this because a lot of people have a hard time engaging their glute muscles, or don’t really know how to fire the glutes.
Do me a favor and imagine you are tensing your glute muscles. Then, actually pull your glutes up and squeeze!!! Using the mind/body technique will help keep your glute muscles active while performing your kickbacks. And, there needs to be activation in your glutes to do kickbacks in a safe manner.
You also have to activate your abdominal muscles in kickbacks. By engaging the core you brace your spine and keep your low back from straining. To engage your abdominals pull your low belly up and in.
If you keep your glutes and core in constant engagement while practicing glute kickbacks, you will properly train your glute muscles. Properly trained glute muscles help you in general movement throughout your day. They will keep you nimble and agile, and make ordinary physical movement a breeze.

I am a devoted mother, wife and yogi with a passion for fitness and writing. I am a certified and registered 500 hour yoga teacher and have been teaching since 2013. When I am not teaching yoga or spending time with my family, you can find me somewhere on a hiking trail in the mountains of Southern Colorado or walking my dog Queenie.

